Let’s talk plastic!
I’ve teased everyone that I’m going to start a podcast about all the little details that are needed to work or finish a piece. Not ready for podcasting, but in the meantime, here’s another post about a tool that we all use in pottery, plastic bags, sheets, or wrap.
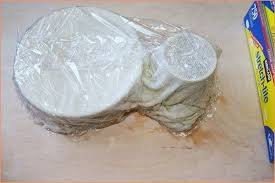
This tool is essential for keeping items workable for a period of time in the studio. In its various forms, we can utilize the protective barrier it provides to protect and control our clay items from atmospheric environments. And plastic lasts quite a while, so we use it until it’s practically in tatters, nothing like a clay studio to break down plastic (we’ll talk later about how long plastic water buckets last in the studio, ha ha!).
For those of you new to clay studio life, welcome! Newbies and experienced potters will often have a stash of plastic bags, dry cleaning plastic or a plastic tub style wet/damp box (more on this later) in the studio. Yes, the tangle of plastic looks a mess, but it’s a necessary tool for us to keep the hydration level constant in order to work and/or add parts to a piece or for storage of work between sessions.
In general, folks gravitate to the plastic they prefer. In our studio environment, I buy the largest, clear recycling plastic bags that I can find. It helps to be able to see inside the bag. Others prefer smaller squares of dry-cleaning plastic, old plastic tarps, etc. For the neat nicks, there’s always plastic tubs with a tight fitting lids (a type of wet box), these stack nicely on racks of course. Generally, use the plastic type that works best for your environment, pocketbook and size(s) of your work. For folks that have timing issues, a damp box, should work the best. These are generally a large plastic container with a tight-fitting lid, with a plaster slab poured to fit the bottom of the tub/container. You’ll need to add water to the plaster on occasion to keep it damp, just put pieces on the plaster, snap the lid down tight and they’ll last for weeks!
Okay, when to use plastic is quite the puzzle in a studio environment. I utilize plastic for working pieces and for wet storage. When working on smaller items that dry quickly, I’ll stack them on the work table on top of plastic. On larger items, I’ll wrap any exposed parts to protect them from the air conditioning (we’re in Texas, it’s sooo hot here in the summer!). Additionally, a lot of the answer to this “when” question is time! When storing a piece, I also consider the hydration level of the piece and determine when I’ll be able to get back to work on it, so that also impacts how much plastic to surround the pieces in. I’ll lightly cover the piece if trying to increase the drying or just tie it up inside a plastic bag to preserve the piece at approximately the same level of hydration to keep it workable (i.e., I’m still building and/or adding parts to a piece), depending on my planned work schedule at the studio. I’ll often use two bags if I need to keep the piece really hydrated or I need to keep the piece hydrated for a longer bit of time because of a too busy schedule and it’ll be a good week or more before I can get back to it.
You’ll need to consider the atmosphere that you work in, is it hot, humid, cool or damp? Pieces will dry unevenly when exposed to some combinations of these atmospheres. So plastic coverings are one of our potter’s tools to control hydration and drying. Keep an eye on airflow where you work and where you store the piece(s). Damp boxes (mentioned above) are a great addition to your studio tools if your time isn’t set on a schedule. Tuck the damp box in a cool corner of the studio where the air and heat won’t dry the plaster slab inside. Where I work in the studio is also a consideration, again, watch where the air flow from A/C vents or heaters typically flow. Finally, scrutinize the surface of where you work – for example, we have MDO surfaced hand building tables which tend to draw water out of the clay, so if I’m working on an item for extended periods of time, I’ll put a bit of plastic down under the item(s) or grab a large plastic bat, to extend the hydration level of the piece while it’s in progress.
My mantra to our students on how to store clay items is “on plastic, under plastic”, especially when storing items for work in subsequent class sessions. For our Open Studio folks (our class graduates) their timing is dictated by the time that they can spend at the studio, so again, using more or less plastic is dependent on their schedule. Setting up a ware board for storage involves that question of time, so, if you are coming back to work on pieces within a day or so, just store them on a ware board and cover the tops of the pieces thrown with a plastic cover. Remember that wooden ware boards are going to wick water away from the piece if storing directly on the ware board and potentially dry the piece unevenly. Beware of leaving items on ware boards for long periods of time without a barrier (yes, plastic sheets, ha ha!) between the clay and the surface of the ware boards or shelves, as in our environment, the wooden ware board mold. When storing for longer term, cover the ware board with plastic, and encircle the ware board with a plastic bag to cover and close up the items. The hardest items to store with plastic are the wheel thrown items of course, they are often a bit sticky at the onset, so I usually blow up the large outer plastic bag like a balloon when slipping in a full ware board, to basically make a little greenhouse environment for the pieces or use plastic on the ware board and tuck a quite large plastic bag over the entire ware board after setting it on a drying rack shelf. The water levels can then equalize the hydration level amongst the pieces inside the bag if the items touch slightly.
Over time, you’ll understand how plastic as a tool works in your studio environment, and hopefully helps you with storage and workable time on your pieces!!